Adding, editing, or copying a data transformation definition
When adding or editing a definition name, note the following:
-
Can include up to 80 characters.
-
Are case-sensitive.
-
Must have a unique name.
IMPORTANT: All the fields (inputs and results) in a single definition must be from the same table. Axiom will not allow you to select a field from a different table.
To add, edit, or copy a data transformation definition:
-
From the Enterprise Decision Support home page, in the Data enhancement and refinement section, click Define data transformations.
NOTE: Only users assigned the Axiom EDS Rules Writer role profile can see and access this feature.
-
Do one of the following:
- To add a definition, click + Add.
- To edit or copy a definition, in the Actions column, click the ellipsis (...), and from the drop-down, select Edit or Copy.
-
At the top of the page, type a name for the definition.
NOTE: Although the forward slash is accepted, you should avoid it.
-
On the Step 1 Select data definition type page, complete the following fields:
Field Description Type Select one of the following data definition types:
-
Assign Constant - Use to store a numeric, text, flag (Boolean), or date constant in an Axiom field. For example, you can store a benchmark or best practices length of stay for hip replacement surgery in an encounter custom field.
-
Basic Calculation - Use to calculate and store a value from Axiom numeric fields and constants. You may combine and group the fields and constants to form an expression using addition, subtraction, multiplication, and division operators.
-
Concatenate - Use to join Axiom fields and constants. You can use the constant as a delimiter.
-
Comparison - Use to create If Then Else formulas that compare Axiom fields to each other or to constants, and store a value based on whether the comparison is true or false.
-
Copy Field - Use to copy the value of one field to another.
-
-
Click Next, or click Step 2 Apply parameters at the top of the page. The fields to complete in this section are determined by the definition type you selected in Step 1. Click the type listed below to complete the definition setup:
NOTE: A definition's inputs and results must be fields from within the same table.
Click image to view full size
-
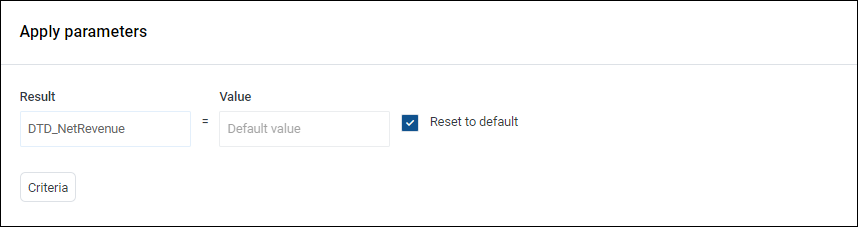
Click Result field.
-
In the Select field dialog, do the following:
-
From the Table drop-down, select the table in which to add, edit, or clear a value.
NOTE: The dialog will only show those tables and fields that you are allowed to update.
-
Select a column name from those shown. You can find a desired column by doing one of the following:
-
In the search box, type the part or all of the column name. Axiom will display columns that include the name.
-
Click the arrow next to the table name to display a tree structure of all the columns.
TIP: Be aware of the maximum character limit of this column. Data going into the result field will be truncated if it exceeds that limit.
-
-
Click Apply.
-
-
Do one of the following:
-
Enter a value - The value you enter in the Value field is determined by the table and field you select in the Table drop-down. For example, if the field is a date field (such as Encounter table > DischargeDate), then a date picker will display.
Value type Description Numeric Type a positive or negative number with up to four decimal places. Date/time Select a date and time. Text Type a value.
NOTE: If the value is large than the field, Axiom will truncate the text.
Boolean Select True or False. -
Reset or clear the value - Some fields in the database store default values. For these types of fields, you can replace the current value with the default value by selecting the Reset to default checkbox. If the Axiom field does not have a default value, then this option inserts a blank (null) value.
-
-
To identify the records in the database in which to apply the value, click Criteria. The Filter Wizard dialog displays, allowing you to define specific attribute to define the record(s) to update. For example, to apply a specific discharge date, you may not want to apply that change to every encounter. You can use the Filter Wizard to define what condition in which to add or edit the value, such as based on procedure code, diagnosis code, or any other attribute tied to the encounter. For instructions, see Using the Filter Wizard.
-
In the Details section on the right side of the page, complete the following:
-
Notes- (Optional) Type your own description to help you identify the definition.
-
Active - Click the toggle to activate or deactivate the definition. Only active definitions can be processed.
NOTE: If the rule is selected as active, then Axiom automatically reviews the definition for any missing information or criteria, which are indicated with error messages. After resolving these issues and saving, the definition can be processed.
-
-
Click Save.
-
To process the definition now, click Process. Follow the instructions in Processing a data transformation definition.
NOTE: You can process the definition later from the Data transformation definitions page.
Click image to view full size
-
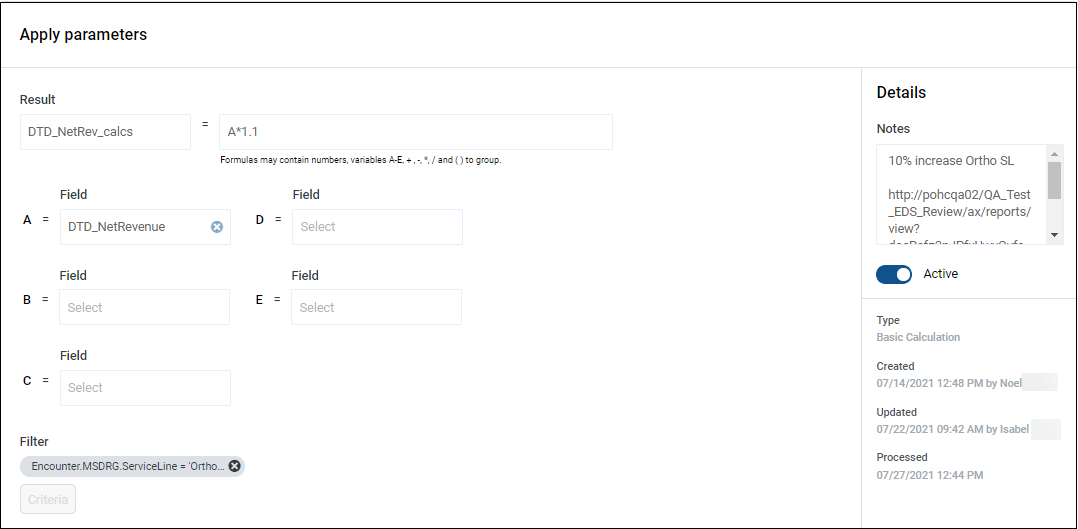
Click Result field.
-
In the Select field dialog, do the following:
-
From the Table drop-down, select the table in which to store the value.
NOTE: The dialog will only show those tables and fields that you are allowed to update. Only numeric fields are allowed for this definition type.
-
Select a column name from those shown. You can find a desired column by doing one of the following:
-
In the search box, type the part or all of the column name. Axiom will display columns that include the name.
-
Click the arrow next to the table name to display a tree structure of all the columns.
TIP: Be aware of the maximum character limit of this column. Data going into the result field will be truncated if it exceeds that limit.
-
-
Click Apply.
-
-
In the formula box, type a formula by using numbers, using the variables identified as A-E, or a combination of the two. Valid operators are:
Operator Description ( ) Use for grouping definition
For example, A+(B*(C-D))
+ Addition - Subtraction * Multiplication / Division -
In Fields A-E, click the fields to select the values to use in the formula. In the Select field dialog, do the following:
-
From the Table drop-down, select the table in which to store the calculated value.
NOTE: The dialog will only show those tables that you are allowed to update. You are not updating these fields, but simply using them as the inputs. Axiom shows numeric fields only.
-
To select a column name, do one of the following:
-
In the search box, type the part or all of the column name. Axiom will display columns that include the name.
-
Click the arrow next to the table name to display a tree structure of all the columns.
-
-
Click Apply.
-
-
To identify the records in the database in which to apply the value, click Criteria. The Filter Wizard dialog displays, allowing you to define specific attribute to define the record(s) to update. For example, to apply a specific discharge date, you may not want to apply that change to every encounter. You can use the Filter Wizard to define what condition in which to add or edit the value, such as based on procedure code, diagnosis code, or any other attribute tied to the encounter. For instructions, see Using the Filter Wizard.
-
In the Details section on the right side of the page, complete the following:
-
Notes- (Optional) Type your own description to help you identify the definition.
-
Active - Click the toggle to activate or deactivate the definition. Only active definitions can be processed.
-
-
Click Save.
-
To process the definition now, click Process. Follow the instructions in Processing a data transformation definition.
NOTE: You can process the definition later from the Data transformation definitions page.
Click image to view full size
-
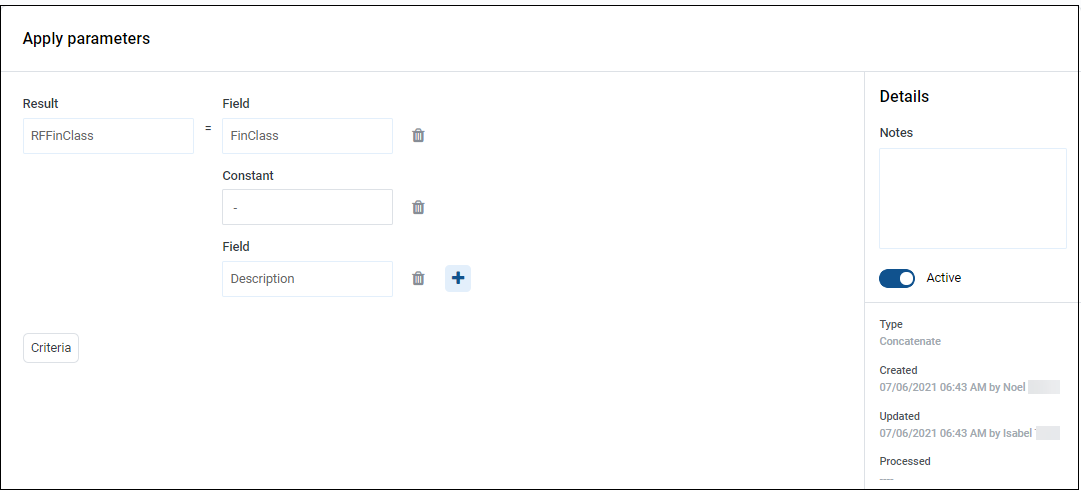
Click Result field.
-
In the Select field dialog, do the following:
-
From the Table drop-down, select the table in which to store the value.
NOTE: The dialog will only show those tables/fields that you are allowed to update. Only text fields are allowed for this definition type.
-
Select a column name from those shown. You can find a desired column by doing one of the following:
-
In the search box, type the part or all of the column name. Axiom will display columns that include the name.
-
Click the arrow next to the table name to display a tree structure of all the columns.
TIP: Be aware of the maximum character limit of this column. Data going into the result field will be truncated if it exceeds that limit.
-
-
Click Apply.
-
-
Click
 , and select one of the following from the drop-down:
-
Add constant - Type a constant value of up to 25 characters, including spaces.
-
Add field - Select a field from the database by selecting the table where it resides.
-
-
As needed, continue to add constants and/or fields by clicking
.TIP: To remove a constant/fields, click the trash can icon
 .
. -
To identify the records in the database in which to apply the value, click Criteria. The Filter Wizard dialog displays, allowing you to define specific attribute to define the record(s) to update. For example, to apply a specific discharge date, you may not want to apply that change to every encounter. You can use the Filter Wizard to define what condition in which to add or edit the value, such as based on procedure code, diagnosis code, or any other attribute tied to the encounter. For instructions, see Using the Filter Wizard.
-
In the Details section on the right side of the page, complete the following:
-
Notes- (Optional) Type your own description to help you identify the definition.
-
Active - Click the toggle to activate or deactivate the definition. Only active definitions can be processed.
-
-
Click Save.
-
To process the definition now, click Process. Follow the instructions in Processing a data transformation definition.
NOTE: You can process the definition later from the Data transformation definitions page.

Click image to view full size
-
In the If section, complete the following:
Field Description Input In the Select field dialog, do the following:
-
From the Table drop-down, select the table in which to store the value.
NOTE: The dialog will only show those tables that you are allowed to update.
-
Select a column name by doing one of the following:
-
In the search box, type the part or all of the column name. Axiom will display columns that include the name.
-
Click the arrow next to the table name to display a tree structure of all the columns.
-
-
Click Apply.
Operator Select one of the following:
> Greater than >= Greater than or equal to < Less than <= Less than or equal to = Equal to <> Not equal to Between Only number or date values are available for comparison Like Only text values are available for comparison
TIP: You can use % and _ (underscore) to represent any string of characters or any single character. For example, %Aspirin will find Baby Aspirin, Buffered Aspirin, etc.
Numeric constant Enter a numeric, date, or text value, depending on the input field type you selected. -
-
Add more If statements, as needed, by clicking
.NOTE: Click
first to select if you are using a value from an existing field or entering a constant.TIP: To remove a constant/fields, click the trash can icon
. -
In the Then section, complete the following:
Field Description Result Select the table and column in which to store the value if the comparison is true
TIP: Be aware of the maximum character limit of this column. Data going into the result field will be truncated if it exceeds that limit.
Text constant Type the text value to add or edit to the field -
Add more Then statements, as needed, by clicking
.NOTE: Click
first to select if you are using a value from an existing field or entering a constant. -
In the Else (Optional) section, in the Text constant field, type the text value to add or edit to the field.
NOTE: You cannot change the Result field here. Whatever result field you selected in the Then section is used here.
-
To identify the records in the database in which to apply the value, click Criteria. The Filter Wizard dialog displays, allowing you to define specific attribute to define the record(s) to update. For example, to apply a specific discharge date, you may not want to apply that change to every encounter. You can use the Filter Wizard to define what condition in which to add or edit the value, such as based on procedure code, diagnosis code, or any other attribute tied to the encounter. For instructions, see Using the Filter Wizard.
-
In the Details section on the right side of the page, complete the following:
-
Notes- (Optional) Type your own description to help you identify the definition.
-
Active - Click the toggle to activate or deactivate the definition. Only active definitions can be processed.
-
-
Click Save.
-
To process the definition now, click Process. Follow the instructions in Processing a data transformation definition.
NOTE: You can process the definition later from the Data transformation definitions page.
Click image to view full size
-
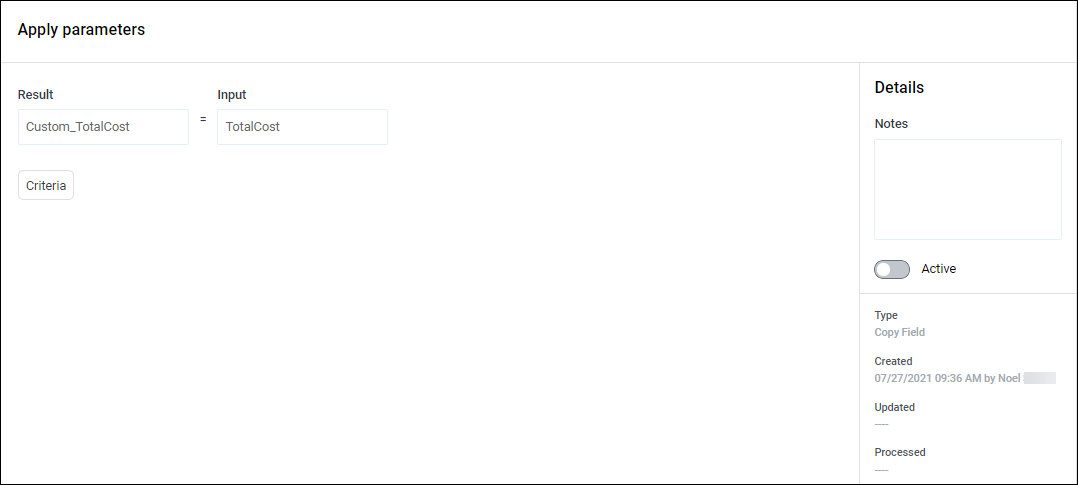
Click Result field.
-
In the Select field dialog, do the following:
-
From the Table drop-down, select the table in which to copy the value.
NOTE: The dialog will only show those tables/fields that you are allowed to update.
-
Select a column name from those shown. You can find a desired column by doing one of the following:
-
In the search box, type the part or all of the column name. Axiom will display columns that include the name.
-
Click the arrow next to the table name to display a tree structure of all the columns.
TIP: Be aware of the maximum character limit of this column. Data going into the result field will be truncated if it exceeds that limit.
-
-
Click Apply.
-
-
Click Input field, and in the Select field dialog, select the table and column to copy the value.
-
To identify the records in the database in which to apply the value, click Criteria. The Filter Wizard dialog displays, allowing you to define specific attribute to define the record(s) to update. For example, to apply a specific discharge date, you may not want to apply that change to every encounter. You can use the Filter Wizard to define what condition in which to add or edit the value, such as based on procedure code, diagnosis code, or any other attribute tied to the encounter. For instructions, see Using the Filter Wizard.
-
In the Details section on the right side of the page, complete the following:
-
Notes- (Optional) Type your own description to help you identify the definition.
-
Active - Click the toggle to activate or deactivate the definition. Only active definitions can be processed.
-
-
Click Save.
-
To process the definition now, click Process. Follow the instructions in Processing a data transformation definition.
NOTE: You can process the definition later from the Data transformation definitions page.
